Pages

WELCOME

Hello! Welcome to my blog, my name is Tawnya. I'm a
Mommy to 3 little ones, a lucky wife to the Man of my dreams. I am a Cosmetologist, Crafter, Photographer and a stay at home Mom. My blog is simply about everything I love from, decorating, DIY, recipes, beauty, hair, camping, kids you name it. I love life and hope my blog can uplift and inspire many. Thanks for stopping by and come back often so you wont miss a thing!
Showing posts with label Kids. Show all posts

January 30, 2016

20 Winter Kid Activities


Winter months where I live have lots of snow! My kids get board since they don't get to do as many things because it gets too cold to be outside all the time. Here is a list of 20 fun Winter activities for kids during the cold Winter months to help make it a little more enjoyable.

  1. Build a snowman
  2. Go ice skating
  3. Drink hot chocolate
  4. Make paper snowflakes
  5. Bundle up and go on a walk
  6. Drive around and look at lights
  7. Bake cookies for the neighbors
  8. Build a snow fort
  9. Dance to holiday music
  10. Make a gingerbread house
  11. Have a snowball fight
  12. Roast marshmallows
  13. Go sledding
  14. Make snow ice cream
  15. Make ice bubbles
  16. Paint in the snow with water and food coloring
  17. Play a game of freeze tag
  18. Snow obstacle course
  19. Scavenger hunt with toys hidden in the snow
  20. Pull each other in the sled

January 22, 2016

How To Make Slime

This is my boys first You Tube video, they wanted to make one so bad! Check it out and learn a fun and easy way to make slime for your kiddos :) The ingredients are in the description down below in the video. ENJOY!

December 20, 2015

Tell Me A Story...


Oh my goodness! We LOVE these at our house. The possibilities are endless. This is a great craft to have your kids make as well. It will boost their imagination and story telling possibilities. My kids can play with their "Story Rocks" for hours and hours. You can buy the canvas bags at a local craft store. Rocks are FREE if you take your kids on a nature walk and tell them to go find some nice flat rocks that you will get to paint. :) You can do so many different varieties, the possibilities are endless. We have made super hero, camping, sports you name it, it can be done just whatever will interest you kiddos. Give these a try and they wont disappoint.

March 9, 2014

50 Almost FREE things to do with Kids this Summer

Here is another fun FREEBIE I made for all my awesome followers :) Just click on the picture and save to your computer and print it.  Leave me a comment I would love to hear some of your fun Summer ideas you like to do with your kids as well. Enjoy!

January 12, 2014

Zoo Passport

My kids LOVE going to the Zoo. It is one of their favorite things to do in the spring. I made this Zoo Passport to use this year when we go. Feel free to download a copy for your kids. I think it will make the trip more fun with them trying to find all the certain animals on their lists. The stars on the book are for them to check them off or you can bring stickers for them to mark off with.  Just staple the pages together to make a book . ENJOY :) Please don't forget to follow my blog for more FREEBIES


CLICK HERE FOR FREE DOWNLOAD pdf
CLICK HERE FOR FREE DOWNLOAD docx

June 2, 2013

How to go camping with kids (the easy way)


Awe the joys of summer are here! One of our families favorite things to do is, go camping and fishing together. I want to share with you my packing list for camping and, tips and tricks to help you have an enjoyable time with kids as well. It is A LOT of work to get everything all ready to go on a camping trip so, I hope my tips and tricks will help your family as it has helped mine.

First print off my camp packing list HERE, it is free!

Get everything you need on the list (these are just what works for our family, I would love to here other ideas that work for your family)

Some of the MUST NEEDS on my list that I think everyone needs are as follows:

Hand washing unit (LOVE THIS, LOVE THIS) we also use it to clean our dishes (thank you pintrest for the post HERE where I got this idea)

Carpet squares for in front of tent. I got mine at my dollar tree $1.00 store. They are heavy so they don't blow away which is perfect! You want at least 4 squares so you can have your kids have room to sit down and take their shoes off before entering the tent. You want you tent as clean as you can keep it since you will be sleeping in it :)

2 pop up hampers (also from the $1.00 store) for inside of the tent. These are AWESOME because you don't have to put your dirty clothes back in with your clean clothes or leave them all over the tent, and it makes finding all your laundry that much easier. They fold up in a small circle when done for easy storage.
You have to bring things for kids to entertain themselves and have fun at the same time. Here are some things that we bring and guess what? All but my paper, sunscreen and homemade play dough came from our $1.00 store! Bug catchers, bubbles, glow sticks for night time, bug catcher kits with tweezers, magnifying glass, cards, crayons, pencils and sharpener.


Homemade play dough is nice and cheap to bring camping. It is super cheap to make and if it gets dirt and sticks in it, it's OK.  Have the kids find rocks and make things out of the play dough.  My boys chose to make blow fish out of rocks with their play dough.


Go on a nature scavenger hunt with them. Download my FREE one HERE

The paper is nice to let them draw in nature and do tree rubbings, trace leafs and such. Bring crayons to have them find rocks and color on them as well. They will LOVE it!

Encourage them and let them have an imagination.

Try to go camping in a place that has somewhere to go fishing close by. If you have boys, let them touch and hold the fish you catch. They think it is so cool. Girls on the other hand might not care to do this part :)

 You can even go find some Crawfish to boil up (this was a first for us, they are really tasty) just eat the meat in the pincher's and tail. Boil in salt water for about 5 mins.


A good camp stove with propane. This is the one we have Coleman even temp 3 burner stove. I highly recommend investing in a good one because they will be great to use in an emergency to cook for your family and not just for camping.
You must always enjoy some junk food and, some S'mores with kids while camping.


Have your kids fall asleep one night on you sitting by the camp fire telling stories and singing songs.

Yes,camping is a lot of work and takes a lot of prep but, I encourage you to go camping and start building memories with your children. Kids love to be outside and have fun with Dad and Mom. I hope you enjoy my tips and tricks and again, if you have some ideas I would love for you to leave a comment and share yours with me :)
Don't forget to follow my blog, new followers make me super happy!!
 Have a great day!

May 13, 2013

Beads, Beads, Beads

Beads are not just for girls to make bracelets or necklaces. They are great for fine motor skills, counting, color sorting etc.. Today I will share with you what my boys like to do with their beads, which all have great learning skills involved.


1) Sorting the colors of beads into a muffin tin


2) Have them count each color and find out which one has the most once they are done sorting all the colors

3) Their favorite, take any toys or stuff animals and trace them with the beads when you pick the object up when you are all done and you have an outline of which ever toy you used. They think it is pretty cool.


4) Add with them. 5+10= and so on

5) Graph them on paper. Have them roll a dice and whatever number is on the dice they get to put that number of beads on the graph paper.

May 1, 2013

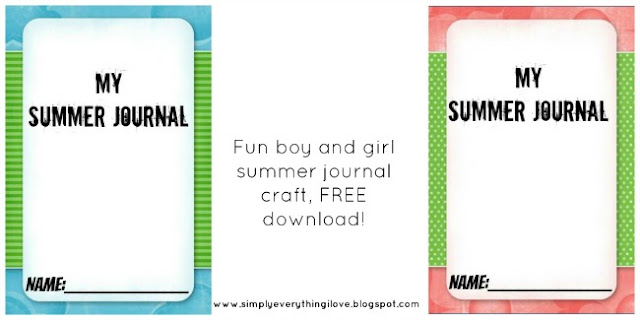
Kids Summer Journal Craft

Summertime is almost here and at our house we like to document in different ways what fun things we do or some of our favorite memories. Today I have some templates I made for a Summer journal. Kids can document any way they like whether it is drawing pictures, using stickers etc.. Let them be creative and see what they come up with.

What you need is:
Download one of my templates either the girl one or the boy one
5 pieces of white computer paper for the center
1 piece of white card stock to print the cover on
Stapler
Markers, crayons


Just fold and staple the paper inside the journal cover
Let your kid(s) decorate the front how they want
Put their name on the front
Start recording your memories :-)
DOWNLOAD HERE GIRL
DOWNLOAD HERE BOY

Enjoy and have a great day!

October 19, 2012

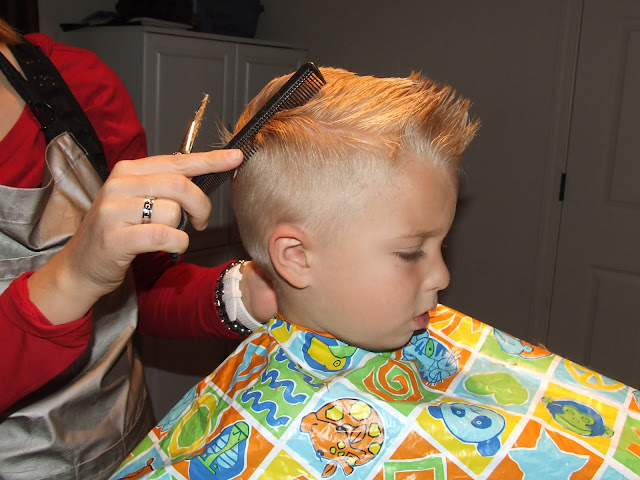
How To Cut Boys Hair The Professional way

 I am going to give you a step by step on how to cut boys hair the professional way (not just a clipper cut). I have been a Cosmetologist for 11 years now and I LOVE doing hair! Really what it comes down to is practice makes perfect. What better way to practice on boys hair because if you mess up it doesn't matter you can just buzz it and that's OK (boys don't mind) It can be very intimidating when you first cut hair. (I remember how scared I was about not messing up) But I promise you can master this skill. Boys need their haircuts anywhere from 2-5 weeks so this will save you so much money in the end to be able to master this skill. I am going to show you how to cut a cute faux hawk and just a basic traditional haircut you can do for any boy =) My boys will be my models.

What you need:
  • Good clippers (Wahl is a good starter one that you can get HERE) this is the kind I will be using. If you want an investment then 76'ers is the way to go HERE:)
  • A comb, ( I like to use a white comb if they have dark hair or a black comb if the have blonde hair) this way you can see the hair really well
  • Trimmer for around the ears and neck line (you can get one HERE) please don't EVER use just the clippers for your edging around the ears and neck, you can cut them soooo easy that way, just invest in a good trimmer and it will make your life much easier in the cutting field :)
  • Cape or towel to keep hair off of them (or just a good old garbage bag cut a hole for the head)
  • Spray Bottle
  • Polmade, gel, Hairspray (Kenra Hairspray (CLICK HERE) and Texture Taffy (CLICK HERE) are the only thing I use for my boys hair they work better than anything)
First my favorite clipper size on boys is a 2 or 1/4 of an inch.  Keep head in an upright position and start from the bottom of the hair line and work with a "light moving wrist" in a C shape towards you up to about the middle of the back of the head (just below where the head starts to curve and turn from the top of the head. Make sure the clippers are against the head at all times until you bring your wrist out towards you in the C motion. Do this all around both sides as well (I like to take it up just too the temples or just barely above the temples. Make sure you ALWAYS only use your clippers on dry hair to get the best even cut.


  • Next I like to trim all around the ears and neck line. My favorite neck lines are the nice clean square but everyone has a different hair line so you will have to go with the hairline for best results. Move the ear to edge around it so you don't cut it, you can either pull it towards the back or bend it out of the way

 pulling it back OR
Bend it forward out of the way
 Square it all up in the back

  • Next wet the top of the head cut the desired length you want starting in the middle and working outwards to each side.
 Spray it all to get wet
Get the length going side to side first and meet all the points together
then go down the middle to connect everything

  • After you get the top length how you want it you need to blend from the top to the sides. Go around on the sides and hold your hand at a 90 degree angle and you will see the point where you need to cut off to blend from the clipper part to the scissor part (I hope that makes sense) I like to free hand it with my comb but I will show you both ways until you are comfortable free handing the blending :)

 This is a free hand with a comb you hold the comb at an angel and connect the points
 You can do the same thing with your fingers, use this way until you are comfortable :-)
Nice clean cut

Doing this you will have a nice blend from the length to the sides without a line

Now for the other one. ALMOST all the same steps as above. This will be a Faux Hawk :-)
 Use the clippers and work from bottom to top all around the sides and back


get the length you want to cut off the top from the middle first go in a "Mohawk way" down the middle
 Cut it and move from back to front and connect it all to the same length

 Now once you did the "Mohawk" (down the middle) you need to bring the hair all up horizontal and connect the outer side to the middle where the length is.
Just connect where there is a high point

Now comb the sides all down.....
it will look messy and not blended yet
take from the top length to the sides at a 90 degree angle and connect the point you will see

or again you can free hand it with the comb

now it is all blended from the top to the sides, do that all around :)

TA DA all done, remember practice makes perfect :-) For those of you stopping by for the first time PLEASE, follow my blog as a favor in return for this tutorial, it would be greatly appreciated and if you already are a follower, THANK YOU!!! To be a follower just go on the right hand side of my blog and where it says "Awesome followers" and click join :-)
CLICK HERE
for my review of my new favorite makeup line :)  
************DON'T FORGET TO CLICK ON OLDER POSTS FOR MORE*************